Browse Tag For

Power Sort box

Showing: 1 - 2 of 2 Articles

Diary of a Scrapbook Room Makeover: Your Questions Answered

Since I started writing my scrapbook room makeover posts, some of you lovely readers have been asking questions about certain items. I wanted to catch up on answering those, if you don’t mind. Or even if you do….bwaha!

From the FIRST POST, “Diary of a Scrapbook Room Makeover: A Prologue”…

JUDY asked:

“My first question for your organizational knowledge is this: What are you going to do with your stickles? I can’t decide how I want to organize mine. I know they should be upside down, but I also like them in a container that I can just grab and go when I get ready to go somewhere else and crop. So, do you have any suggestions for that?”

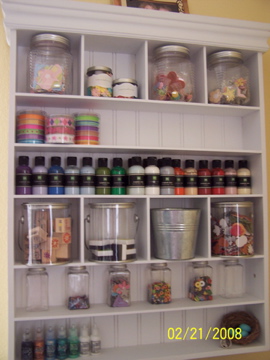
Answer: Ever since I started collecting Stickles (yes, you are not allowed to own just one Stickle….if you buy one, you will soon find yourself needing more, and before you know it, you have a Gang of Stickles….I currently have 15 bottles)….Okay, so, ever since I started collecting them, Judy, I’ve been keeping them lined up in anal-retentive, ROYGBIV color order on my Making Memories Embellishment Shelf. This is an older photo, from when I only had 7 Stickles, but you get the idea:

I did hear at some point that it’s best to store them upside down to avoid the applicator clogging but, since clogging hasn’t been a problem for me, I totally ignored that suggestion. It reminds of those pesky exercise tips you see bandied about. I mean, exercise??? Doesn’t apply to me, so why would I take note??? But in the interest of helping out my Stickles Sista, Judy, I went and found a couple ideas for ya…

Here’s an economical route from SHAYLA’S CREATIONS. Looks simple, and it’s pretty to boot.

Tons of great Stickles Upside Down Storage ideas here at OBSESSED WITH SCRAPBOOKING. Now, even though the names of our blogs are similar, we are NOT sisters. But I do love her. She shows people who have more Stickles than I do, which makes me feel not so ashamed. I think my favorite idea is the mini-lunchbox, although then your pretty Stickles are hidden away and their bottled sparkliness cannot add extra shine and glimmer to your day each time you glance their way.

At the bottom of her post, you’ll see where TIM HOLTZ says it’s fine to store them either way, but if you store your Stickles upside down, they may glurb out when you open them. {Glurb is not an official word, if you were to ask Merriam-Webster, but it seriously should be. Are you with me? Let’s start a petition!}. So, it’s sort of like the G.D. ketchup that G.D. glurbs out because I store it upside down in the refrigerator because that’s how the bottle is made and I’m just following directions. Yep, your Stickles’ll be just like the G.D. ketchup. Just sayin’….

Judy, I’m sure I’ve answered your question and about 50 others by now, right? So moving on….

Here is a question from my THIRD POST, “Diary of a Scrapbook Room Makeover, Part Two”:

Jkaye asks: “very interested in your JETMAX cubes- do you like them? And are they heavy- as in too heavy to stack on a Rubbermaid like table? I might have to stick with my rubbermaid 3-drawer containers as for the weight is okay for now..I am sure the Jetmax ones would be much heavier..”

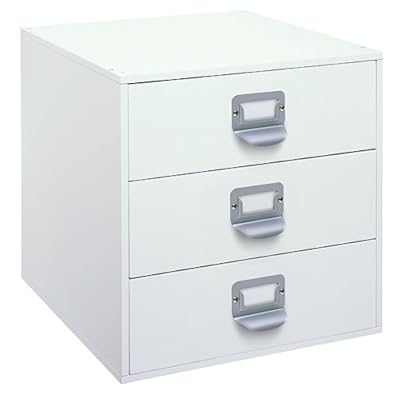
Answer: First, let me clarify (see photos below). The stack of cubes I have along the wall (there are 10 cubes plus a half cube) are the heavier duty cubes called Store in Style. As for the Jetmax cubes, which are lighter weight and can be found at Target and Michaels, I own 3 of the 3-drawer cubes. However, I’ve only assembled one and haven’t stored anything in it yet. So I’m not an expert on the Jetmax cubes, but they are definitely lighter and smaller than the Store in Style cubes. I did a weight comparison test of the Jetmax cubes and the Sterlite (like Rubbermaid) 3-drawer containers with the 12×12 drawers. I actually weighed them on a scale. The Jetmax 3-drawer cube weighed 15 pounds, and the Sterlite 3-drawer container weighed 5 pounds. So, Jkaye, I’m not sure if putting the Jetmax cubes on your table would be do-able. But definitely do not plan on putting the Store in Style cubes on a tabletop. They are MUCH heavier then the Sterlite containers.

STORE IN STYLE CUBE (3-drawer)

JETMAX CUBE (3-drawer)

STERLITE 12×12 CONTAINER (3-drawer)

On that same post, YvetteDownUnder {who has a cute, funky, phresh scrap studio} said: “Can I ask you about the Powersort boxes? What dimensions are they? You guys in the US have an abundance of cube options, but we are more limited here in Oz, so I wonder if they would fit in an Ikea Expedit? Most of my photos of now scrapped in albums :) and I need to downsize those that aren’t from multiple photo boxes. I am tempted by the Power Sort, but not yet 100% sold on it. So fitting it into my storage could sway things.”

Answer: To answer this question, I thought I’d pop my azz right over to CreativeMemories.com and find the dimensions of the Power Sort Box for Miss Yvette. But, no, they aren’t listed on the website. Isn’t that a little weird? I mean, how many potential buyers have NOT boughten them (no, “boughten” is not an official word either, but seriously, if we can make “blog” and “snorkel” and “obfuscate” real words, can we not make “boughten” official? It sounds much cooler than any of those other words. Man, someone needs to have a talk with those dictionary people!). Okay, so how many people have not boughten those Power Sort boxes because they didn’t want to commit without knowing the dimensions?? Oh, I get it! That’s their way of forcing you to speak with a Creative Memories Consultant! Ah, yes, mystery solved.

Since I can’t find the dimensions online ~ and as much as my CMC would luuurrve a phone call from me at 2am ~ I decided to get out of my comfy recliner, put my laptop aside, pause “TMZ” on the Tivo, and go measure my Power Sort Box myself. No, really, Yvette, it’s alright. Don’t feel badly. It wasn’t THAT much trouble. Really. (Man, am I making you sorry you ever asked this question? LOL!). So the measurements of the Power Sort Box are: 14.75″ x 13″ x 5.5″. I don’t know if that works with the Expedit but I hope so. They are crack-a-lackin’. I love how they hold so many photos, are archival safe, and you can pull the little holders out to rearrange how they are in the box, to take a chunk of photos to a crop, or just to your desk to scrapbook.

Okay, I think I got all your wonderful questions answered. Thanks for asking, and I hope my answers were helpful. No worries, the smart-assidness was no extra charge. See, “smart-assidness”….yet ANOTHER unofficial word that should be official! For shizzle….

Diary of a Scrapbook Room Makeover: Part Two

I’m slowly making progress on the big overhaul of my scrapbook room. If you’re not caught up, you can read the PROLOGUE and PART ONE, if you like :) But the Prologue is important reading; it’s where I tell you what happens if you make a smart ass comment about how much crap….erm, STUFF I have. Yes, I have a lot of paper. No, you can’t shop here. Yes, I have a life. Blah blah blah….

So, I’ve done lots of furniture moving. This is going to take awhile, so get comfy…

1. Unloaded everything from the desk – underneath, off the top, and in the drawers – and moved it about 2 feet closer to the sliding glass door. I didn’t repack the office supply and computer-related stuff I had in the desk cupboards; need to find a new home for all that. It’s in a pile here somewhere…

2. Unloaded all the DVDs, videos, and board games from the oak cabinet and moved them into a cabinet in the guest room/new play room. Moved a bunch of toys that were along the wall into the new play room. Moved the oak cabinet to the wall where the toys had been. Moved the Scrap Rack to the oak cabinet (temporarily, I think…). Moved office supplies, and office machines (fax machine, transcription machine, etc.) from guest room to bottom of oak cabinet (where movies and games had been). This cabinet is going to be Office Stuff Central…unless I change my mind.

3. Emptied out the legal filing cabinet, moved it from a back wall to align with one edge of the L-shaped desk, and refilled it with the same stuff I had in there before, which are greeting cards, school supplies, and more home office stuff. I gathered scrap magazines and idea books from various places around the house and piled ’em up.

IMG_1506

As you can see, it’s time to purge these again. I usually do this about once a year but, yeah, it’s been awhile. A friend that I scrap with recently finished her project of pulling pages and ideas from her magazines and organizing them into page protectors in a binder. I’m so jealous….it was great! So I’m deciding now if I have the time, patience, and devotion to do the same thing. Purge or make “the perfect idea binder,” THAT is the question.

As for all those idea books….I don’t think I’ve EVER gotten rid of an idea book. Something about throwing away a book that I paid $15 to $40 for is much harder than a $5 magazine. But I should look through all my idea books and maybe toss some older ones. I’ll bet I don’t even “scrap like that anymore” for some of them, huh?

4. Moved the table that I’d been using for scrappy stuff (okay, to dump things on…) over to the area by the storage cubes. This will be the famous Homework Table.

IMG_1432

5. Moved the couch and coffee table from in front of the desk to behind the desk by the back window. The original plan was to put it flush against the wall and lined up directly under the window (I’m all about symmetry, baby!). But once I got it there, the couch seemed kind of squished over into the corner and the coffee table was somewhat blocking the walkway to the back part of the room. So I tried the couch at an angle, and I liked it. Bonus: It creates a hidey space behind it for ugly stuff, lol. And I felt so “HGTV” about it, too.

IMG_1420

6. Unloaded just about everything from 10 Store in Style cubes (see couch pic above), moved the cubes to the opposite end of the room, and reloaded them pretty much the same way. The SIS cubes are now on the wall that the oak TV cabinet used to be on. This is the area I talked about where I have to keep a walkway to get to the slider, so the cubes are a good thing to put here. They fit nicely and I can stack more on top someday if need be (God forbid!).

I first thought about configuring them like this, with a kind of “turn the corner” at one end….

IMG_1427

…but decided not to. The positives were that it would be a little different-looking, and it would create a handy little empty space back there in the corner to store crop totes or something. But the negatives were that it made the walking path a bit too slim, and put the cubes right next to the cord for the blinds. And when I put embellishment jars on top of the one by the door, they would block the light switch. No super big deal, but I just decided to go with putting them all flush against the wall, like this…

IMG_1428

All this furniture moving happened way back on 9/10 (it’s now 9/27!), so when I say “making slow progress,” I’m not exaggerating. It took me awhile to remember and write all this down, the order I did things in. It was quite the feat of engineering to move things AROUND the room while still having everything IN the room. I apologize for any dark photos but most of my madness occurs late at night after everyone has gone to bed. Man, you should’ve seen the wide eyes of my husband and kids when they came out the morning after all this! They were like, “You moved ALL that by yourself!?!? The couch???” and I’m all, like, “Desperate organizers take desperate measures.” (Like, totally…I did all that “like” stuff just to annoy you). Then the daytime photos are overly bright because of the sun coming in all the windows, so I can’t win, lol.

Once the furniture was in place, I’ve just been slowly putting things away, whether within this room or the other parts of the house where they belong, and below is what the room looks like as of today.

Down there is the new back half of the room, with my cool slanty couch, and my corner of chaos. The couch was my dad’s before he passed away so it’s sentimental. Luckily, it’s also functional so I have an excuse to keep it always and forever. That big tub is all the paperwork from my two scrapbook businesses, MEMORY WORKS and Calla Memories. I can get rid of most of it. I just need to go through it and save some paperwork for tax records and such.

The white shelving unit has all my mini album stuff – supplies and some completed albums – but I want to get rid of that shelf and find another way to store my mini album kingdom. That’s actually a shoe shelf so I’m hoping to then move it into my closet and use for, oh, I don’t know…..SHOES???

The basket on top of the white shelves contains letter stickers, which were all nicely sorted by color at one time, and easy to thumb through when I scrapped. Then….I discovered THICKERS. Dun dun dun dunnnnnnnn! I use Thickers lots and I buy Thickers lots. I have a Thicker addiction and I hope there ain’t no cure! But, yeah, I need to go through that basket and purge some old alphas I’ll never use. Like the first major set I bought oh so many years ago, of punch out alphas (I think they were by COLORBOK) in every color and pattern known to man (including plaid and leopard!), in a bubble font, a lollipop font, etc. Eek. Perfect for the kids to use on school projects but NOT for my scrapbooks).

The black boxes are POWER SORT BOXES from CREATIVE MEMORIES and that’s where most of my printed photos are. But photo and memorabilia organization is an ever-changing and never-ending project/battle for me. I’m not even gonna’ GO there right now. The white cubes they’re in are ITSO brand from TARGET. As you can see, I had more photo boxes than Itso cubes, so I bought another Itso from Target when they were on sale recently. (If I remember right, I paid $12 instead of $20). You can see it on my desk in the next photo.

IMG_1504

Below is my mess of a desk, and my flooded floor (flooded with scrap crap, that is). There’s the new Itso cube, and one of my new 3-drawer JET MAX cubes. Actually, “new” is relative since I’ve collected 3 of these units over time from MICHAELS using 50% off coupons. I’ve just never put them together, knowing I had this big re-org project coming up. Recently I assembled one and, man, are they a pain in the asset! Don’t get me started. If you’ve put these together, you know what I mean. (I feel sorry for THIS poor scrapper!) I’m dreading the assembly of the remaining 2 but I shall do it, I shall.

IMG_1505

I’ve done a little more work on the Wall of Cubes and this is how they look as of now…

IMG_1507

The cubes themselves were already pretty organized before I started this crazy project, as they contain the staples of my scrapbook world: Bazzill cardstock sorted by color, die cut/shaped papers, extra page protectors, scrapbook projects, etc. Most of the vertical files by CROPPER HOPPER are sorted by manufacturer and include patterned paper and all embellishments from that company. They could use some tidying but for the most part, the vertical files are good as they are. The gingerbread jars on top, however, are another story. When I first got them way back when on Craigslist (read about it HERE), I had them organized pretty well, but over time I lost control and just started throwing new things in with no rhyme or reason. I’m going to do a post soon about using 2 of the jars for my chipboard letters. There’s one full of flowers, and the rest I plan to use for random embellishments by color. I also put my ribbon jars back on my cubes…ribbons are sorted by color. I love my cubes and jars…they’re my favorite part of my scrapbook room. Can’t wait til I get this part totally done! My pretties, LOL…

So, that’s where I’m at for now. Thanks for sticking with me. I promise I’ll get done eventually, but real life has to come first, so it’ll continue to be slow progress. But progress is progress, right?

Related Posts Plugin for WordPress, Blogger...