As I talked about HERE, my scrapbook space / home office / kids’ homework area was badly in need of some cleaning up and organizing. I was considering “going for broke” with a batch of free time I had coming up. In the end, I didn’t have as big a block of time as I’d hoped but I decided to try and make a dent in things anyway.
Although I didn’t do a major re-haul and purge, I did get my whole scrapbook office cleaned, dusted, and vacuumed. I got a lot of things thrown away and put away and tidied up.
Major accomplishment: I can see the floor and my desktop again! Woot!
Since there wasn’t a huge amount of progress, I’ll just share a couple of Before and Afters.
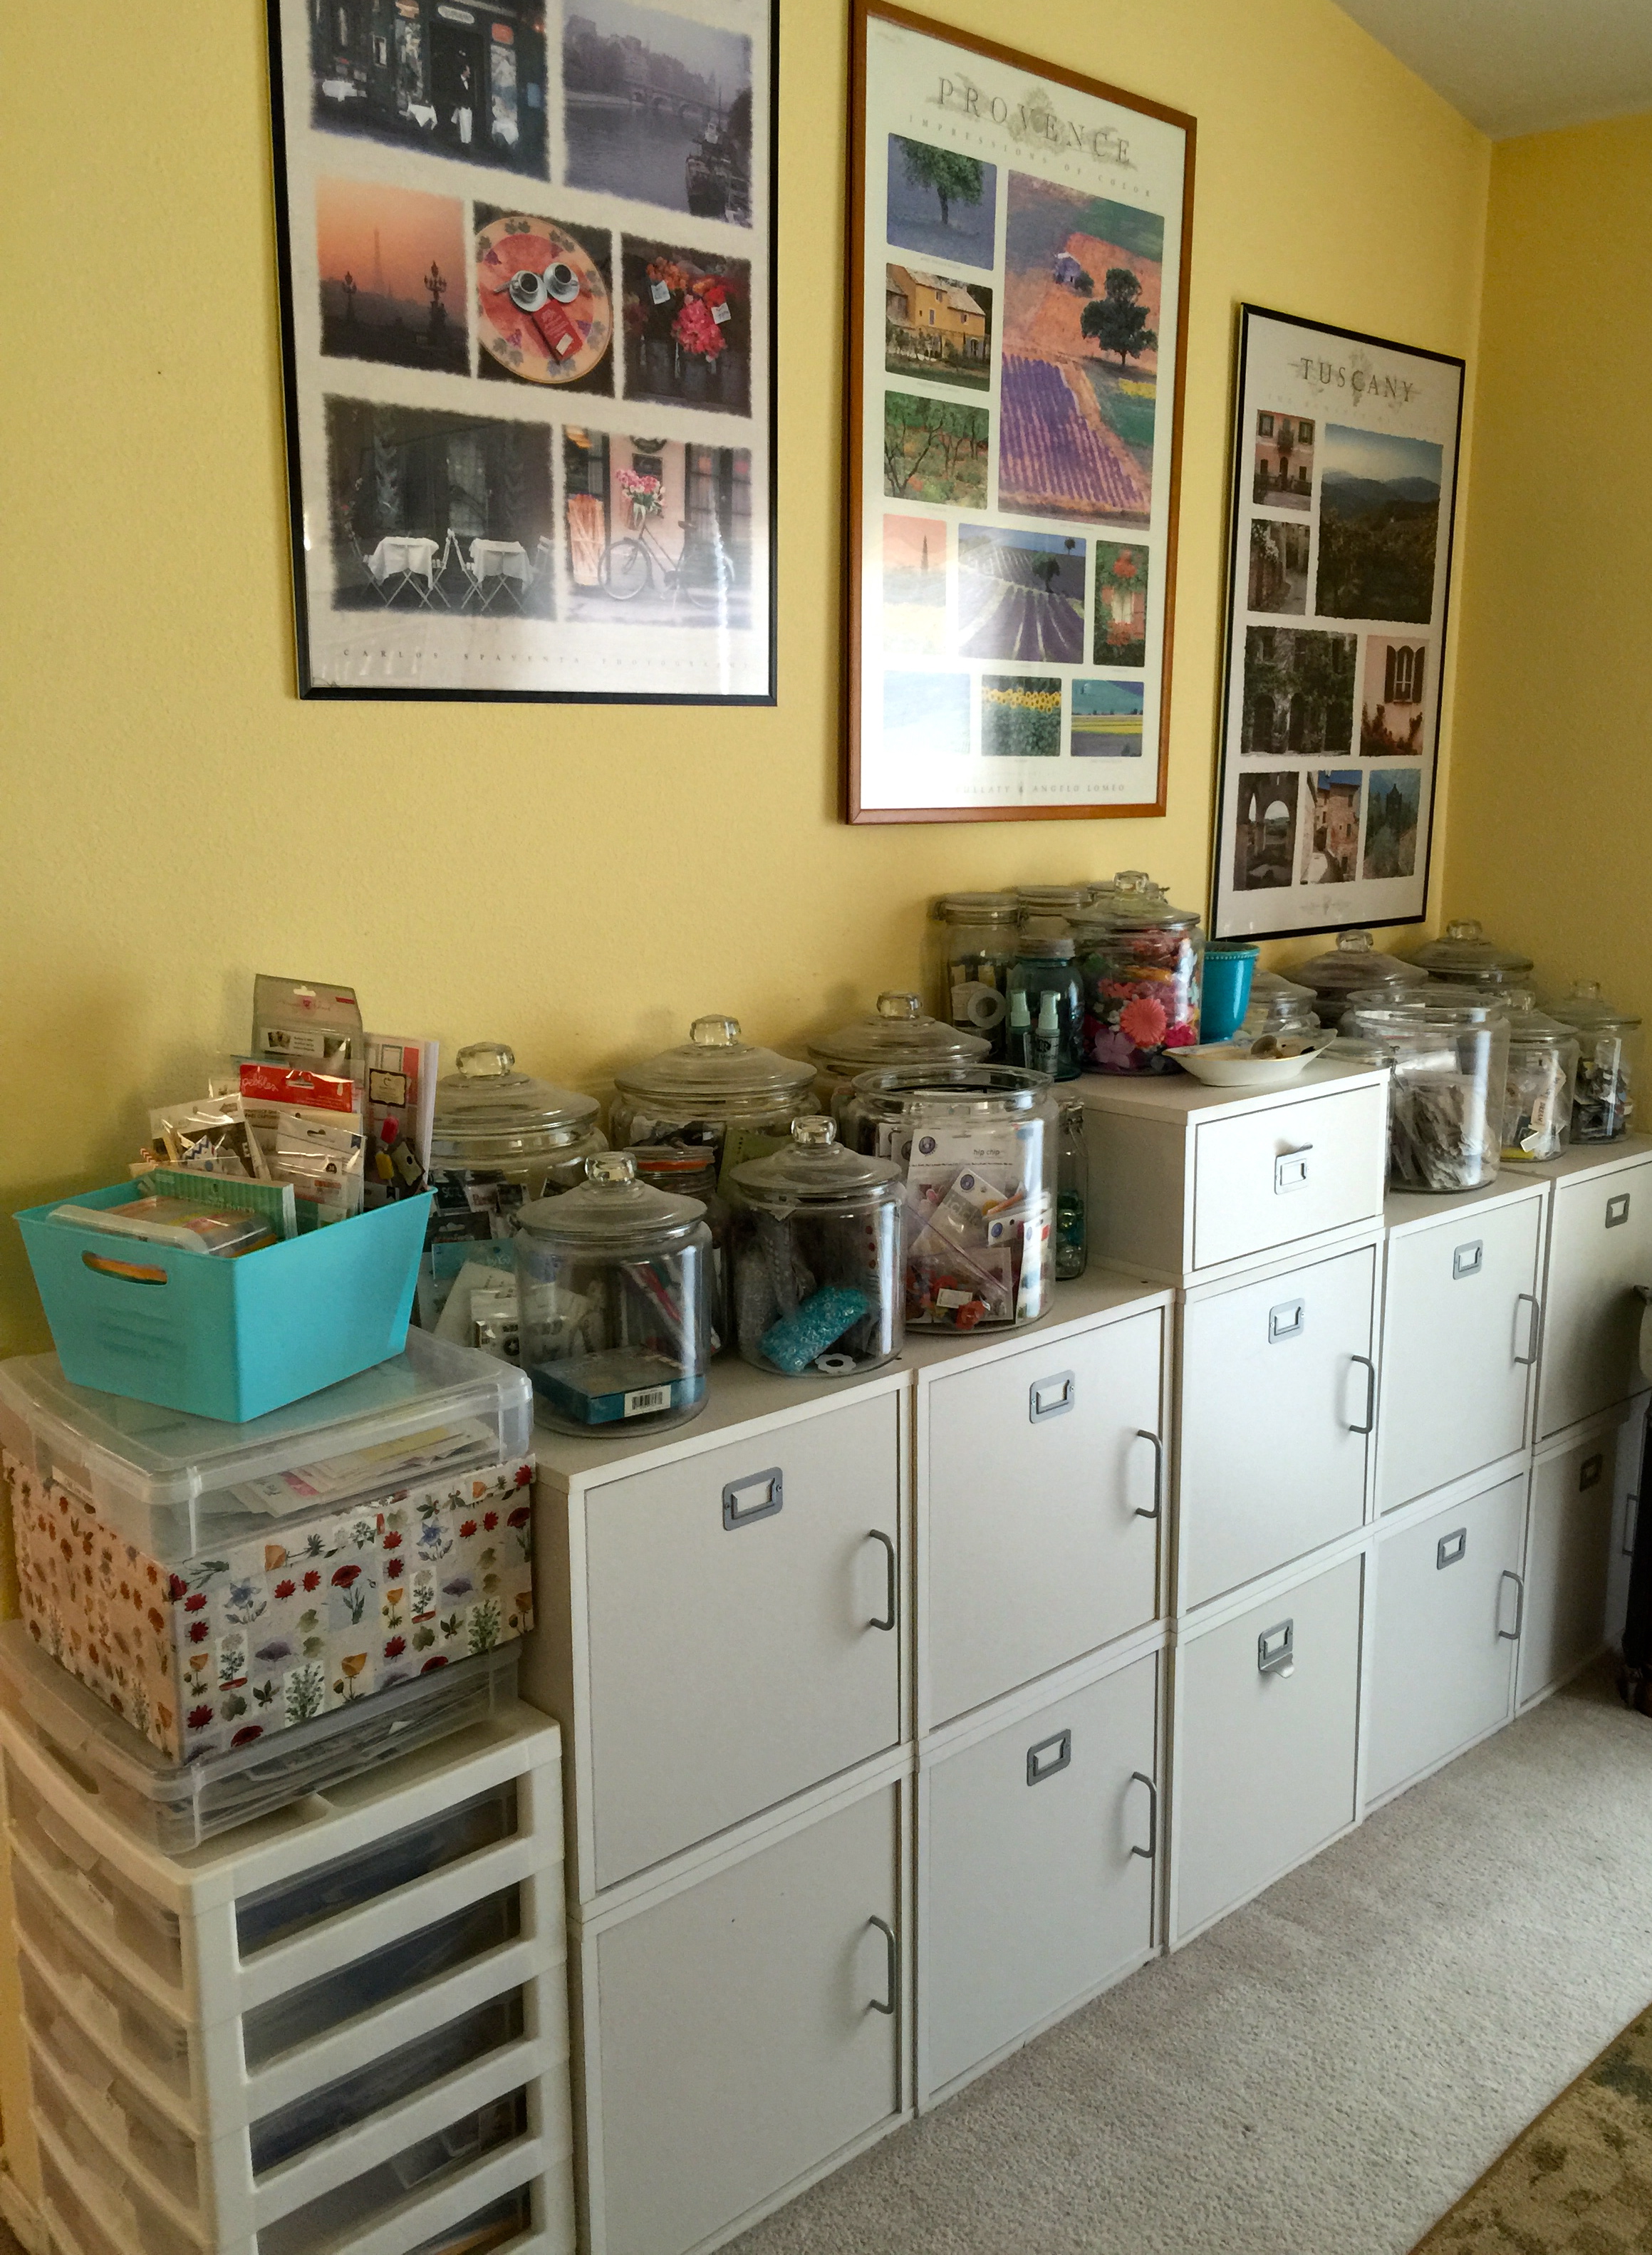
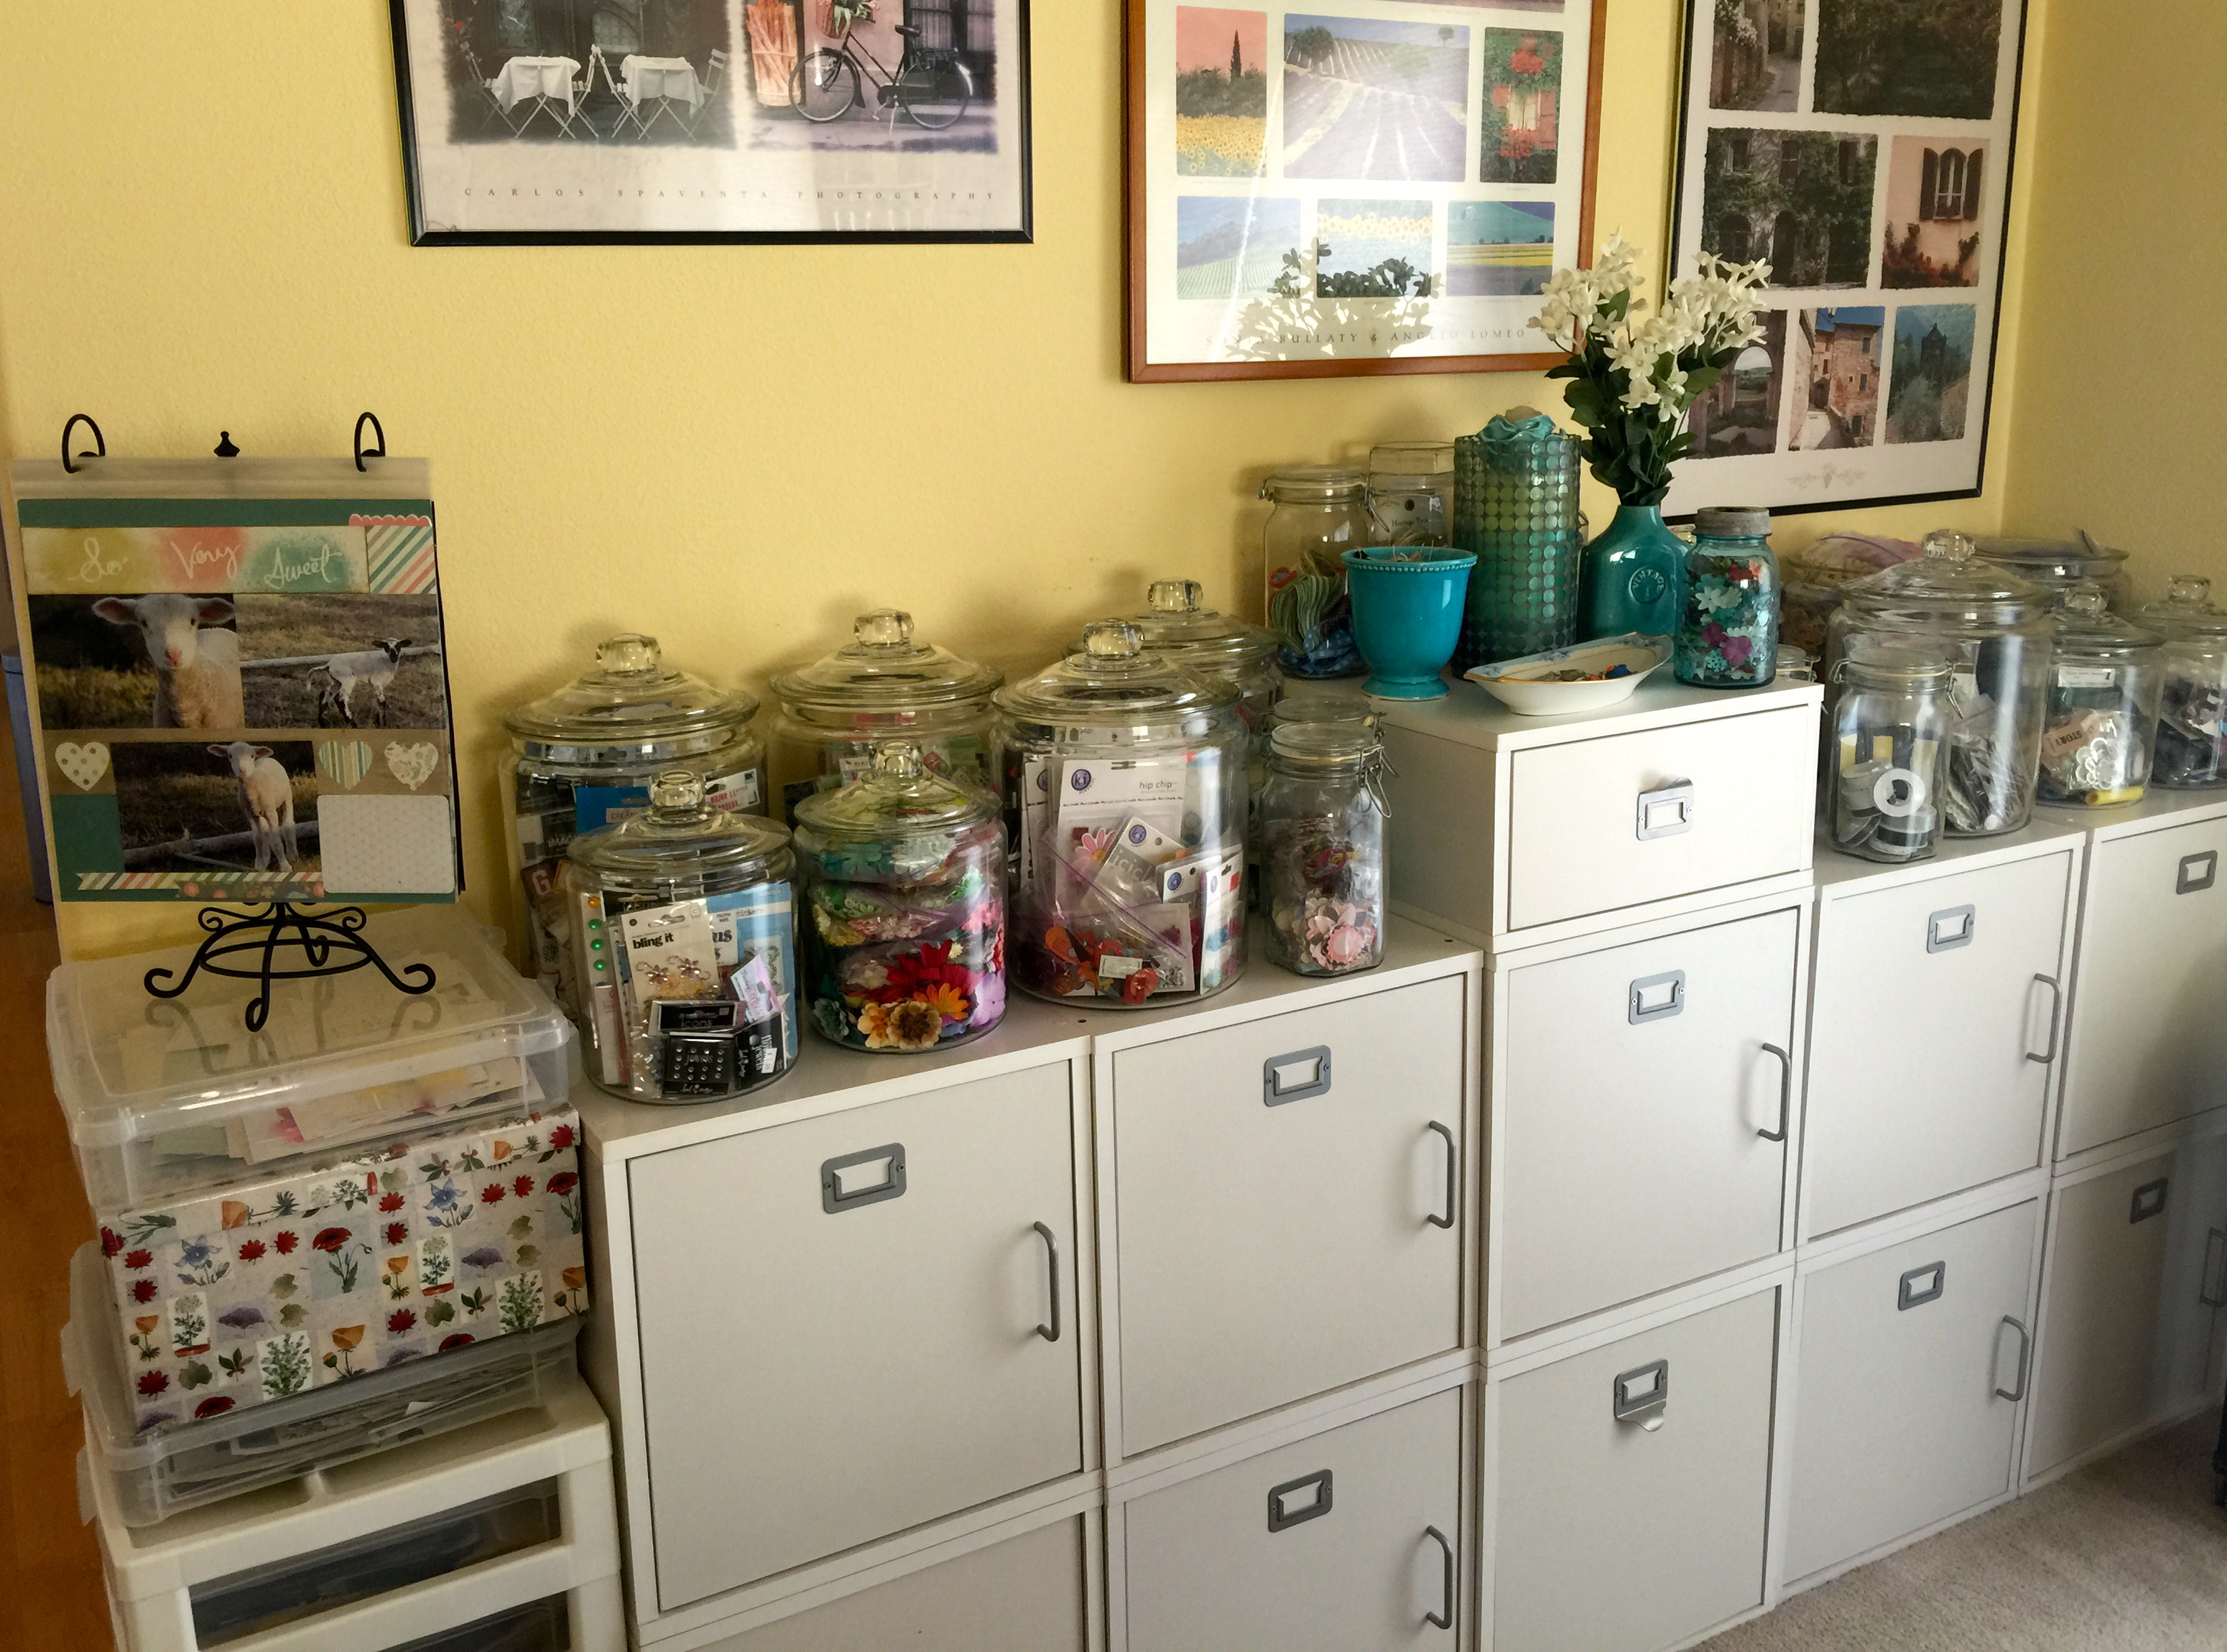
This is my area of Crop In Style cubes (holding mostly albums, projects, paper, adhesives, etc.) and candy jars (holding embellishments, chipboard letters, flowers, etc.).
BEFORE
AFTER
I washed the lids on all the jars so they sparkle now. I dusted everything, did a little bit of rearranging, and purged a little. Overall, it doesn’t look that much different. I did move the turquoise deco items in the middle over here from my desk but I don’t like how it looks; too crowded. I have some shelves to hang one of these days and most of that will be moved to the shelves.
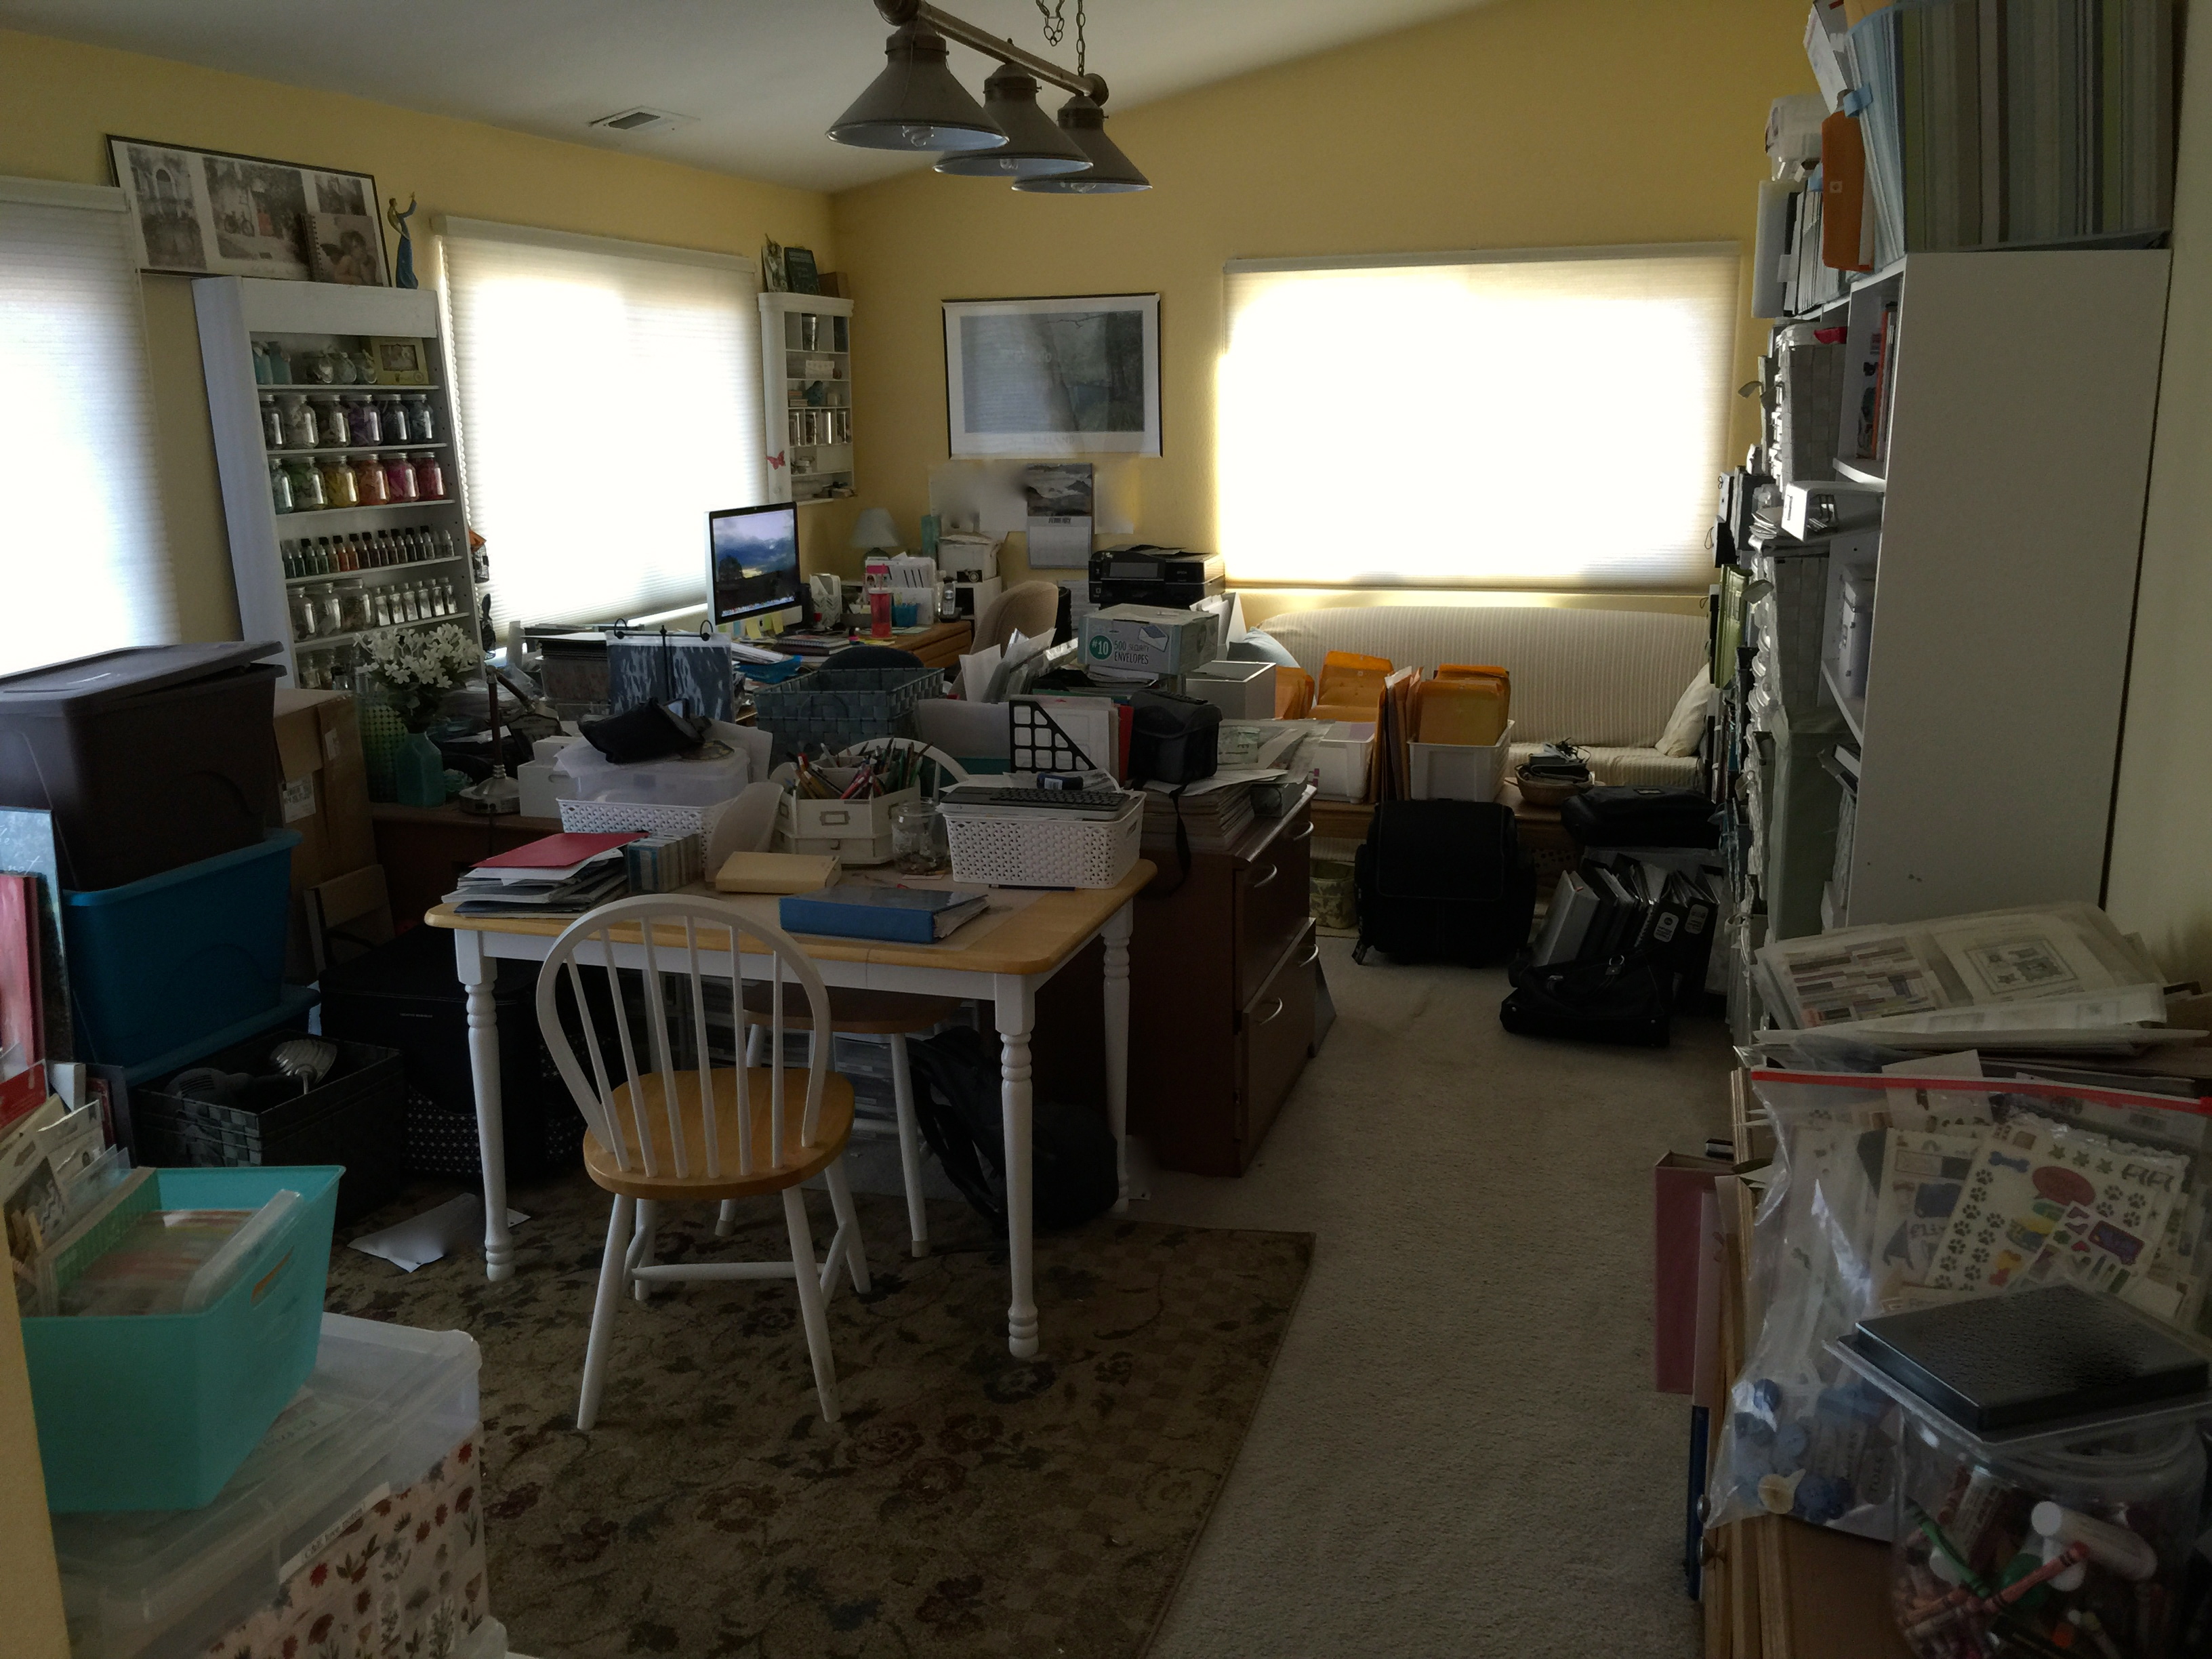
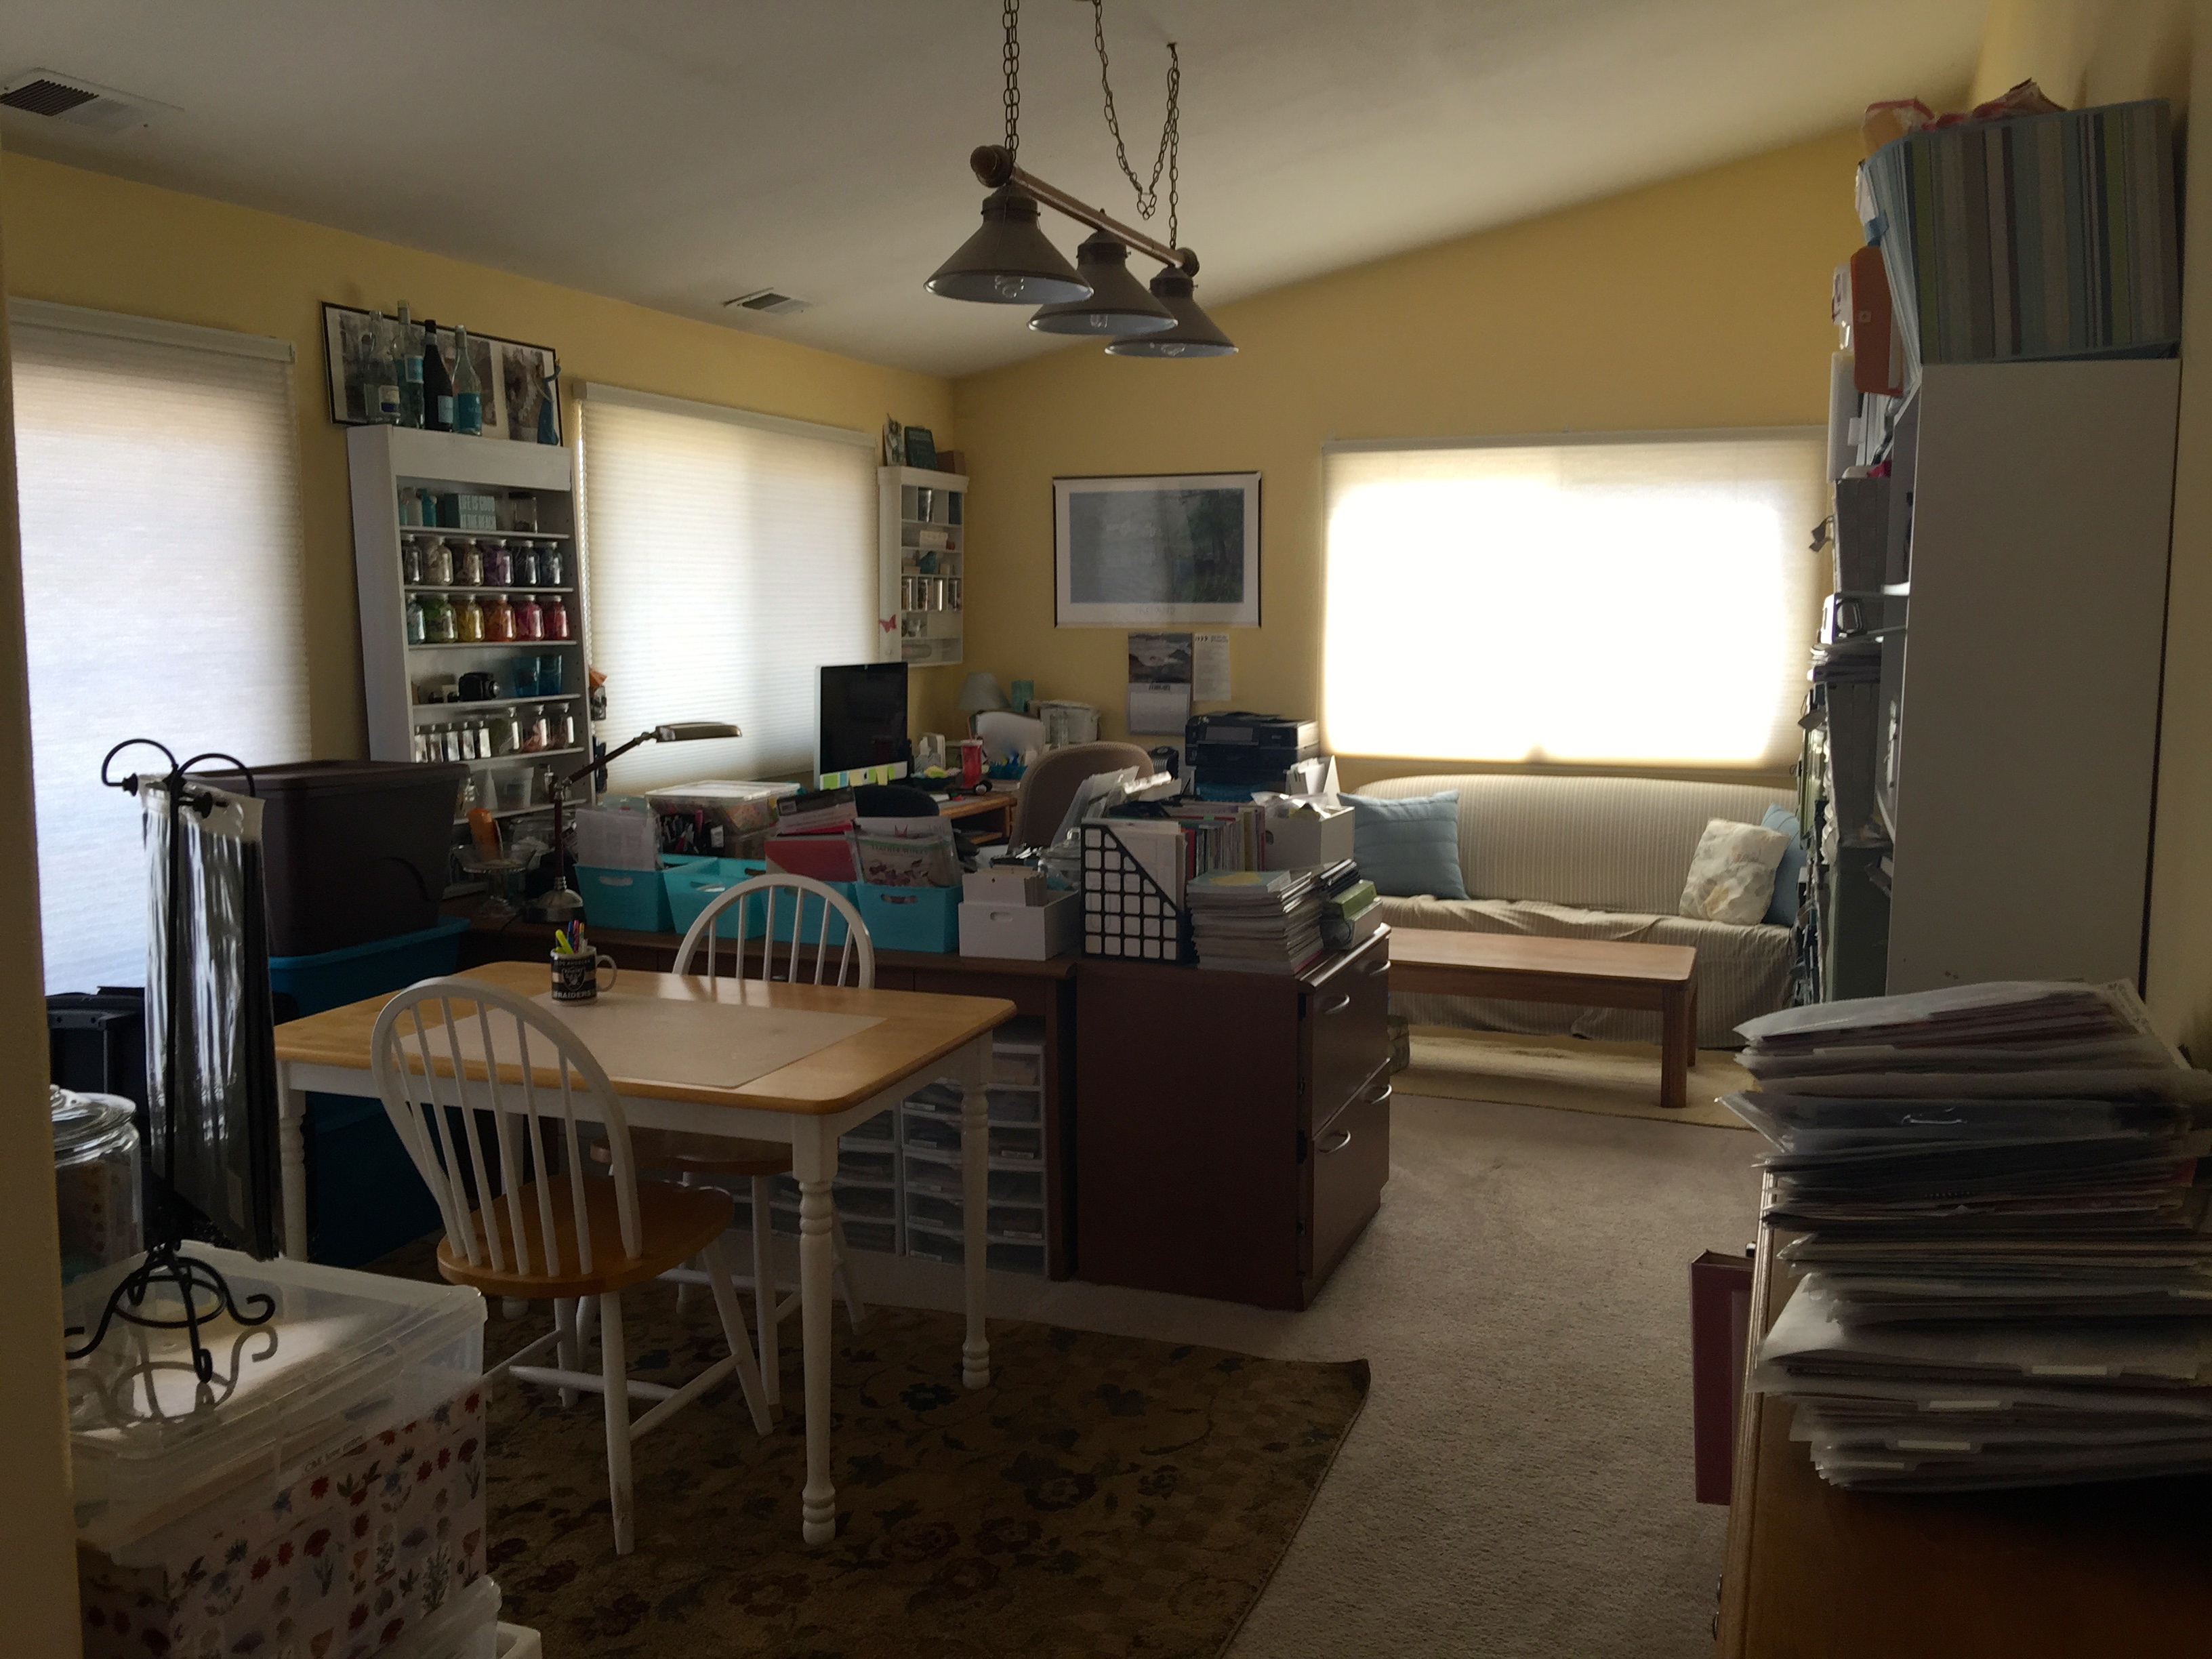
This is a whole view of the room.
BEFORE
AFTER
You can tell that I generally just straightened up and cleaned. I can see the surface again of the coffee table, homework table, and – like I said – my scrapbook desk. I even cleaned off a patch near my work/home office desk and it’s nice to be better organized there.
It feels really good every time I walk in the room. It’s nice to know – when I have my next block of free time – I can actually scrapbook. Now, isn’t that a rare feeling? LOL I hope this is a little inspiration if you need it – to do a little tidying of your own space so you can get scrappin’! I would love to hear about any progress you’ve been making lately; feel free to link to photos or blog entries in Comments :)
As I said in my LAST POST, now that the scrapbooking part of my office has been reorganized I’m going to do a series of blog posts showing the befores and afters and explaining how I organized.
From the whole room photo in my last post, you couldn’t even see this but it’s probably my favorite part of the room. It’s the wall made up of STORE IN STYLE CUBES and a variety of jars.
Here’s how the setup looked before my latest reorg project.
BEFORE
And here is the new and much improved version.
AFTER
So back to how it looked before:
*Disclaimer: I own so much MME paper because I bought a few of those huge packs that they sold at Costco years ago. I used the papers for goody bags when I held crops, sold them open stock, etc. There’s no way I’m EVAH going to use all that MME paper. But I have no plausible excuse for the rest of it.
In the past, I’d bought these cubes, assembled them, and put them in a good configuration for the room. I didn’t want to stack them too high because I need to be able to get to the jars spread across the top. {Otherwise – I love these stinkin’ cubes so much, I totally would stack them to the ceiling, lol}. In the past, I had also started using the CROPPER HOPPER VERTICAL FILES to store my paper and embellies by brand name.
I used a label maker to label each file with the brand name, then put in 12×12 papers along with embellishments. I like to store a lot of my things by manufacturer because when I go to scrap, I pull out that whole file and pretty much everything matches. I don’t have to rack my brain going, “Now, did I buy the matching letter stickers to go with this?” or “What paper would look great with this one?” Everything I need is right there.
So that organizing scheme worked out well but, as you can see, as I bought more items, instead of taking the time to pull the vertical file out and put the new things in their proper place, I just kinda’ shoved them on top. Hey, at least I got them in the right cube! But yeah, not the most effective way to find things later on and it sure started to look messy.
As you may know, my original plan to reorganize my scrap room/home office was to take 3 days really focusing on it, emptying everything out of the room, then put things back in an organized way, purging unwanted things as I went. {Details are HERE}. Needless to say, it didn’t much go to plan after Day 3 :)
But this photo is from Day 1 when I cleared most of the cubes out and moved all the paper files and other things to the dining room and living room.
I decided to keep some things where they were because their organization wasn’t going to change. The drawer jam-packed with adhesives and SNAPLOAD packs was left alone, as was my filer cube which has generic patterned papers filed by color.
Then it was time to install the doors on cubes that were still open.
I’d bought the doors months {gulp – or maybe even a year} ago but they’d just been sitting in boxes in my scrap room since then. I ain’t gonna’ lie … I absolutely HATE putting stuff like this together, even when it’s something this easy. I’d rather, like, go to the dentist or watch paint dry than assemble something. But I finally did it.
And leave it to a scrapbooker – when I couldn’t find any Elmer’s or white glue to install the magnets, I just used my trusty GLOSSY ACCENTS. Hey, same diff. It’s all sticky, right? And just think how glossy and shiny it is inside those tiny holes in the cubes. I bet they feel really special.
Okay, here’s some more things that didn’t get removed from the room because they were going to stay essentially the same.
These 4 gingerbread jars were chock full and had been organized already (journaling spots, flowers, and chipboard letters sorted into baggies). They didn’t need anything but a quick wipedown with Windex to get rid of some dust.
Speaking of cleaning …
Here are all the lids of the gingerbread jars laid out on the homework table drying. Yep, I washed everything with soap and water because I wanted to start over sparkly clean.
In the background of the photo, you can also see where I started to fill in the cubes. I decided to move the Vertical Paper Holders to another part of the room. Part of the reason was to prevent fading of my papers. Can you see the lightswitch to the top right of the photo? To the right of that is a sliding glass door that gets full sun for half of the day. I noticed that the edges of some of my Beloved BAZZILL was fading :( I know, right? We CANNOT have THAT. So even though doors were going on those cubes, I thought it would be a good idea to move all my papers away from the sliding glass door.
Here’s what the cubes looked like once I got all 7 doors installed.
It looks so much neater, doesn’t it? The Store in Style DOORS only cost $13 each which I think was a good investment for my space. Other than the fading issue, another important advantage is that now I can use the cubes to hide things I don’t feel are very attractive to look at: empty albums, pages/page protectors, projects, etc. Most of these items used to be kept on an open bookshelf and I just hated looking at them. They looked so sloppy not to mention uninspiring. Now they’re hidden {wink}.
Here’s a closer photo of some of the things that are now kept on top of the white cubes.
Jar, jars, and more jars! There are also a few decorative things that I’m starting to collect that are in my favorite colors ~ turquoise, ocean green, robin’s egg blue, and white. These are colors that remind me of my favorite place in the world: the ocean. The Ball canning jar on the left I got from an antique store in Seattle last year. The pretty vase on the right is from a nursery near the beach house we stay at each summer. {I know I should put something cute inside it but I like that grassy straw stuff it came with for some reason, lol}. The dish is from my mom who is an expert at collectable china and often gives me pretty things. I’m thinking I can use it as a holding area for pretty embellies or flowers until I put them away in the proper jars.
Speaking of all those jars … I don’t have a good picture of them all put together, do I? But I’ll go across from left to right and tell you what I have stored in them:
– Sport embellishments
– Making Memories embellishments
– K & Company embellishments
– Ink pens
– Bling
– MAMBI/KI Memories embellishments
– Mists
– Flowers
– Chipboard
– Ribbon
– Twine and jute
– Photo corners
– Chipboard letters
– Journaling spots
– My Minds Eye embellishments
– Misc. embellishments (2)
– Decorative river rocks
– Decorative glass shells
– Empty (1)
Yes, I actually have a small ginger jar that is empty. It’s one of the jars without a lid so it’s harder to think of things to put in those. Maybe that will be an “embellies to file” jar or something :)
So back to the final product.
AFTER
You can also see my travel art hanging on the wall above the cubes. As I mentioned before, I wanted to add some personal touches that WEREN’T about scrapbooking this time around. I love to travel although I don’t get to do it much, so I dream through pictures of other countries and reading books about them. My first love is Italy but I dream of traveling all throughout Western Europe someday. For now, I can look up from my desk, see images of Paris, Provence, and Tuscany, sigh, and be content with dreaming.
With each of these entries, I’m going to put a list at the end of products I’ve used and where I got them, so here goes…
STORE IN STYLE CUBES: I collected these over time by using 40% or 50% off coupons at MICHAELS. You can also get them from Oriental Trading (the link is above).
GINGER JARS: I got these ones AND MORE for $40 from a local candy store via CRAIGSLIST. I’ve seen these at BED BATH & BEYOND which seem to be the same thing. THESE are sure cute from Pier One; you can label them with chalk.
MASON JARS: I’ve had these for ages but I got them at Pier One. I can’t find them on their website but THESE ONES from Amazon.com are sure cute.
Thank you for checking out my “cubes and jars” wall in my scrapbook space and please let me know if you have any questions!
In my last POST about all the new Jetmax storage items at Michaels, I mentioned that I had a hard time putting one of their 3-drawer storage cubes together…so much so, that I was dreading putting the remaining two cubes together. EILEEN on AMR just asked for storage cube advice in a thread over there, and this was my answer so I figured I’d post it here, too. I also have some storage cube recommendations.
Of the Jetmax brand, all I have are the 3-drawer cubes and the problem I had is the “wood” is so thin, that if you don’t get the teeny screws for the drawer sides in there exactly straight the first time, you never will (believe me, I tried). So then I had to really push super hard on the screwdriver to get them to go in. Mind you, I had to use the teeny screwdriver so there’s nothing to pad your hand while you’re cranking down on it either. You could use a cordless screwdriver of course, but ours doesn’t have a tip that small. There were 4 screws per drawer so I went through this struggle 12 times. Then I went to slide the drawers into the cube (which was also a pain to assemble), and they wouldn’t slide in until the screws were COMPLETELY flush with the sides of the drawers or even recessed a bit. More cranking on the tiny screwdriver and by that time my hand was already bruised.
All that said….maybe I’m the only dummy in America who wouldn’t just go buy a tiny cordless screwdriver head for this one project, LOL! It also takes 2 sets of hands to assemble the cubes themselves, holding the sides perfectly perpendicular to each other while screwing in the tiny screws while you can’t brace it against anything to accept the pressure. Does that make sense? I’m sure some would find these things easy to assemble, but I sure didn’t….
The Store in Style brand is wonderful and uses a much easier cam lock system. You can literally put together the cube itself in 5 minutes. They’re also sturdier and larger, but more expensive. I don’t know if Joann’s or anyone carries them where you could use a coupon. I got them with coupons “back in the day” when Mike’s carried Store in Style.
You might also look into ITSO plastic storage at Target. The cubes take no assembly per se, other than sticking little pegs in each corner (if you want to stack them) to bind them to each other. They have all kinds of drawers, baskets, shelves, and such and you can really customize it. I have 3 of those ~ just the plain cubes ~ that I stack my CM Power Sort Boxes in. If I had known about Itso before I invested in the Store in Style, I probably would’ve done my whole wall in Itso. It’s cheaper and more flexible with the configurations you can do. Here are some Itso REVIEWS; two of them are from scrappers!
Anyway, there’s some more info and photos of all 3 types of cubes HEREand at the bottom of THIS post. If you’re in the market for scrappy storage, I hope that helps ya!
Okay, time for Part One of hopefully many posts in my scraproom makeover diary. You can read the Prologue HERE about why I was skerred to write about this in the first place…
I suppose I should start by explaining my current scrap space situation, and why it was time for such a major “makeover.” For about 6 or 7 years now, my scrap space has been shared with my kids’ play room, which consists of the majority of their toys, games, and puzzles, a TV with VCR and DVD player for watching movies, and a couch. The couch is perpendicular to the wall and kind of splits the room in half. Behind the couch is where my scrap space is. I have a large, L-shaped office desk and matching file cabinet, a table, and 10.5 STORE IN STYLE cubes like this….
…mostly open cubes but a few with doors or drawers. Then I have 2 of the 4 sets of shelves along the wall (some of my books [yeah, the other thing I hoard] and the kids’ stuff is in the other 2), and various Iris carts, containers, and mish-mosh storage items. I also hide a lot under my mondo-desk (wink).
As you can imagine, this was already a lot of stuff and two busy purposes to fit into one room, even though it’s good-sized. I have always liked sharing my space with the play room because the kids and I hang out in there a lot together. Or at least we did, until it also became “the dumping ground room.” That was not supposed to be the plan, LOL! Look, I’m a busy mom. Due to this stupid economy, I’ve been working 50-60 hours a week. The kids do sports, I do Bible study, I sell Memory Works, clean, do constant laundry, take care of a puppy, blah, blah, blah. Not making excuses, just explaining how this all got out of hand. I simply haven’t had time to focus on an organized home, as I can barely function on the 4-5 hours a sleep I get per night as it is. So anytime something new enters the house and I don’t have time to make room for it in a closet, or get rid of something else to make room for it, it gets dumped in the scrap room/play room. Ugh. (Hint, I’m preparing you for the photos so you don’t go into a horrible shock).
Here’s my other problem…I’m an admitted pack rat. I’m trying to reform and I certainly don’t want an intervention by my family, so I’m always working on it and fighting it. I get occasional bursts of energy where I purge the pantry, clean out my bookshelves, fill garbage bags with old clothes, etc. But admittedly, things have gotten out of hand in the last year or so. Well, I’m plenty sick of it and it’s time to make it right. Other than the sheer clutter, one thing that really bugs me and has to change is that the kids play area has to be moved. You have to walk through their area to get to mine, and to get to the sliding glass door to the backyard. No matter how much I nag, a fact of life is that they WILL leave toys, books, puzzles, etc. on the playroom floor…right in the path to those two places. And it’s their play area, ya know? They should be ABLE to leave out projects they’re working on, Monopoly games in progress, or art work interrupted, right? I’m just tired of stubbing my toes on all of it. If I step on that little shoe from Monopoly in my bare feet one more time…why I oughta!…..
So I had the bright idea to not only purge and re-organize my scrap space, but to move their play space to the guest room. We’ll move their toys and games, and get rid of some along the way, too :) Their TV and movies can also be moved, which will at the same time provide a TV in the guest room for my mom to watch when she comes to stay with us. This is a semi-tangent…but the way it is now, their playroom TV is about 15 feet away from the living room TV, so when the grownups are trying to watch something, we’re often competing with the kids’ TV. It’s kind of funny, the battle of the dueling remotes…we can’t hear, so we turn up our volume. Then they can’t hear, so their TV goes louder, and before you know it, the house is very LOUD. Now their TV will be farther away and behind a door, so we can now watch R-movies with “the language” and not constantly have to push mute for fear they’ll overhear, and they can watch SpongeBob and his annoying, nasally laugh to their heart’s content, LOL. By the way, I {heart} Patrick….
So. Decided. Playroom stuff moving to guest room. which means that my scrap space has room to expand and breathe. However, as much as I want the kids to have their own place where they can shut the door and watch a movie, or be able to spread out with their games, I also want them to still “need” to be in my scrap area sometimes so we can spend time together. And wouldn’t it be nice to have somewhere else for them to do homework, etc. other than the nice, oak dining room table? Why, yes. Yes, it would! That’s why I’m going to repurpose my scrap table into a Homework Table for the kids, and keep it in my scrap room. They’ll still have a place and purpose in my area, which is really cool. Also, I’ll still have the couch in my scrap room (erm….the cleaned off, easy-to-lie-down-on couch…) so they can come and chill, read a book, tell me about their day, whatevs.
I think I’ll utilize what used to be the DVD/game cabinet (see pic below) to store office supplies, etc. and free up more room in the guest room, where all that stuff currently resides. I used to keep this kind of stuff in a cabinet in there, which will now house the TV and games. Make sense? Just a straight swapperoo!
Being the anal, plan-ahead, worrier type that I am, my wheels are turning about what furniture to move where and how to store what. I pull out some graph paper and draw a diagram for my “new” scrap room. See, I’ve always had to call it a “scrap space” before, but now I can say “scrap room.” Yeah! There are two things I need to work around initially. The sliding door to the backyard means I have to keep a decent walkway available in that area of the room. Also, there are four 5-shelf cheap-o bookcases lining one wall and they need to stay put. They’re mounted to the wall with brackets, as we’re in earthquake country, and I’m not in the mood to unmount and remount those stinkin’ shelves. Besides, this room has a vaulted ceiling and the shelves are on “the tall wall,” also a long, solid wall, so that’s the logical place for them anyway. The best part about the shelves is that by moving the toys and stuff off of them, I’m gaining almost a whole shelf unit for my scrappy stuff….niiiiice. I’m going to move some of my books out of the guest room, and make one whole set of shelves for my books, too.
After 2 tries, I come up with a good room diagram for how want to arrange things. Now, I can drift off to sleep, and dream about someday scrapping in a more open and organized space….Oh, wait, I can’t sleep yet. I have one more thing to do and I can’t procrastinate any longer…
I guess now it’s time for the thoroughly embarrassing photos. I needed DH to move the TV for me when he had a moment, so that’s the only thing missing from the original (highly cringe-worthy) status of this room. Gulp! Here you go…
This is the wall to your hard left as you enter the play room area through the open doorway from the dining/living rooms. You can see the slider I’m talking about to the far right. The TV sat on top of that oak cabinet, and it’s filled with games and DVDs. All those pieces of stacked wood are to construct the hutch that goes with my desk, but I decided not to use it after all, so all those pieces are going in the attic. Those old toys are trash and we’ll see if we can use the plastic baskets for toy storage or something, or maybe to hold outdoor toys in the garage?
As you will see, this is the room to dump plastic containers that have rotated out of use. And I don’t know if you can see them, but behind the hutch pieces and then leaning toward the door frame, there are pool cues. Yes, pool cues. Growing up, my grandparents had a pool table in their rumpus room. Every time we’d visit them, all the kids would play pool. When my grandpa, then grandma, passed away, my mom asked what I wanted from them to keep I chose were the pool cues, among some other things. We had a pool table at the time (in this room, in fact) and I wanted to remember my wonderful grandparents and how much fun I had at their home whenever WE played pool. So, even though I have no practical use for pool cues now, I haven’t been able to get rid of them. I have such a hard time letting go of sentimental things like this. But I will. I’ve decided to take photos of them, and scrap this little story about them….and let them go. See? I’m learning…. Okay, time for another upsetting photo…
This actually disgusts me to look at, how ugly and horrible this room is. Here’s the couch we can no longer sit on, because things just get dumped here: A box of wedding china, a globe, boxes of toys given to us, pictures that need to be hung, a box of sentimental baby items I want to keep, newspaper with an article to scrapbook, a DVD to put away, another empty plastic bin, an empty Memory Works box to break down and recycle, etc. Behind the couch is my L-shaped desk with an over-full ScrapRack (major purging will happen there!). Man, don’t be surprised if I delete these photos from the post when I panic…this is TOO embarrassing!
Okay, deep breaths, deep breaths! It’s going to get all better, with time, hard work, and patience. Someday soon, I’ll look back at these photos and laugh. Right?
It’s Sunday night, and I just got done watching Desperate Housewives and Brothers & Sisters. That Sally and Calista, they had me a-booin’ and a-hooin’ again tonight. When Nora is telling Kitty how she thought she finally saw her as more than just the mom who drove her to ballet lessons, and Kitty shows her the book dedication…all to Nora, who she couldn’t have written the book without. {Sniff, sniff}. Mother/daughter relationships are so complex and deep…that show really knows how to capture it all.
Okay, well, just wanted to give an update on some of my past posts….
The RUMMAGE SALE: It was Saturday morning and, wouldn’t you know it, not a drop of rain here in months but when does it decide to rain???? Saturday morning, and only Saturday morning. Not a drop of rain except during those rummage sale hours. But it went okay anyway, I guess. It was a community rummage sale, where you pay for your space and that money goes as a fundraiser. I was stationed next to a friend of mine, so we gabbed all day between making sales. I’d say I sold about 1/3 to 1/2 of what I took out there, even some of the scrapbooking stuff. One gal came back three times, LOL! The biggest sale from SB stuff was an SEI 8×8 album in a box, it was from a CKU class, and was all pre-done, just pop in your photos and add the journaling. I sold it for $12, although just the materials were worth more than that. But the color scheme was something I was never going to use so why not? It went to a happy home, a young high school or college age scrapper who said she would scrap more if she had time. I hope the purchase helps her get a quick album done :)
Another success story {follow me on this, I promise, it will make sense}: So, on the other side of my space was a lady selling homemade chicken taquitos and pork and chicken tamales. OMG. That was just cruel to make me smell that yumminess all day! {Mexican food is my ATF, All Time Fave}. About half way through the morning, I ate my little Tillamoo cheese and non-fat Yoplait yogurt. Fighting like a real warrior against giving in to that Mexican food. Then DH says, “I’m taking off, there’s a game on so I’m heading home. Please bring a mess of those taquitos home for me.” At first, I’m like “WTF??”….then I realized hey, there’s my excuse to buy ME some taquitos, too, LOL! So I ask the lady, “Are you going to be here til the end, because I want to buy some taquitos to take home?” and she says, “Yes.” So at the end of the day, I still had about 2/3 of the clothing I had put out for sale and was dreading bagging it all up and taking it to AmVets. The lady from the taquito place comes over and is looking through all the clothes (they were kids clothes) and I can tell she’d like to have many of them but is only setting aside a few. So I said, “You know, you can just have all those clothes if you want them,” and her face totally lights up. Then she says, “I’ll give you food in exchange.” I mean, was that the Deal of the Century or what? Too funny….
So, all in all, it was a good day. The kids ran around and played with their friends, I got to chat with a friend, offload some things I didn’t need, and I got to eat taquitos! And we were blessed by God’s rain which, even if you’re trying to hold a rummage sale, is a beautiful, blessed thing.
Now, to update my SCRAPBOOK STORAGE post: Gosh, this is me at my most indecisive. I measured my room and figured out how many more Store In Style cubes, doors, shelves, etc. I would need to make the perfect set-up. Let’s just say the number of cubes was in the double digits, but still cheaper than buying an Ikea Expedit and having it shipped (since I don’t live anywhere near an Ikea), or any other scrap storage options I could find. I found a great online site to order them from since Mike’s no longer carries them. And there they’ve sat in my Shopping Cart for over a week. I finally got over the price tag, but then started imagining the day 4 jillion boxes were dropped by UPS on my doorstep. I truly think DH would bust a gut, maybe even an aneurysm, over that one. I know this from experience, that he doesn’t care about the what’s and why’s and ‘but honey, I got such a great deal on it!’. All he knows is his wife went mad buying scrap stuff and he would be none too happy. So then I thought, what if I just buy a few at a time? But, no, it’s still UPS dropping packages here, still busting guts, still aneurysms, still not good. So my latest idea hit me when I was at Mike’s last week trying to spend my 40% coupon on something I actually needed. Duh, storage cubes, nimrod! I bought one of the cubes that they now carry, I think the brand name is Jetmax. I got the 3-drawer one like in this picture:
They are regularly $30, only $18 with the coupon. Now I’m going to see if I can make it work with collecting a bunch of these babies to create my Scrap Storage Nirvana. They are slightly smaller than the SIS cubes and since I have an odd number…well, it’s hard to explain without drawing a diagram, but I’d still need to buy a few SIS cubes. Then hopefully I can fill in the rest of my wall with the Mike’s ones. I’ll just buy one a week with my coupon, and spend actually less money than buying the SIS cubes online. I have a little windfall cash set aside just for this project and I need to get going on this before the vacuum cleaner or washing machine breaks (that would be SO my luck). Just remember, my well-made decisions can spin on a dime, but that’s the plan…for now!
Finally, to update my QVC post, I did watch most of the QVC scrapbooking shows and no, I didn’t buy a single thing. Not because I didn’t want anything, merely because….no money, no shop-ee. Times like this, I wish I were Katie Holmes…{wink}.
Hope you had a wonderful weekend. Did you do anything scrappy?